tinyAVR 1-Series
I’ve been using AVR microcontrollers for a few of my projects. The ATtiny85 is a great little 8-pin DIP or SOIC chip which is perfect for a morse keyer or controlling an LCD display over I2C. For those projects requiring more program space I’ve used the ATmega328P in the form of an Arduino Nano, but this is quite large and the only surface mount part is in a package I’m not confident I can make a PCB for or solder. The ATtinies are limited to 8K program space which is just not enough.
In 2016 Atmel launched the tinyAVR 1-series. I thought the ATtiny3216 would be perfect for my projects. It has 32K flash and is available in a 20-pin SOIC package which is perfect. One major change is the use of UPDI for programming the devices instead of the SPI based 6 pin header that the older parts use. UPDI only requires two pins which will simplify things somewhat. But I can’t use my USBasp programmer.
Atmel make a number of evaluation boards for their microcontrollers. There isn’t one for the ATtiny3216 but I chose the ATtiny817 Xplained Mini as a close equivalent. The device on these only has 8K of flash but the peripherals are all the same. But the main reason for buying this board is that it can be used as a programmer for any device with UPDI. It does require a little bit of wiring as Atmel haven’t provided a location for a header.
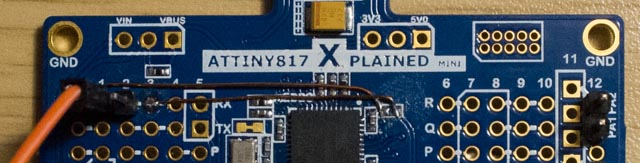
Section 4.4 of the ATtiny817 Xplained Mini user guide shows how to disconnect the UPDI from the onboard ATtiny817 by removing R203. I mounted a pin header in the unused area at the top left of the board and ran wires back to the R203 position. This way I can either connect the two pins together with a jumper to program the on board ATtiny817 or connect to the left pin for programming an external device:
I made a PCB with an ATtiny3216 and decoupling capacitor so that I could use it in a breadboard. Here it is along with an I2C level shifter, a Silicon Labs Si5351A oscillator chip on a daughter board along with a rotary encoder and an I2C LCD:
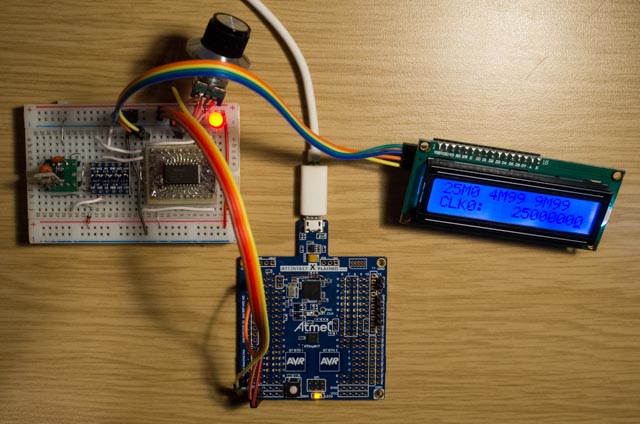
The ATtiny817 Xplained Mini is providing 5V from its USB connection along with UPDI for programming the ATtiny3216.
To enable programming of any device via the ATtiny817 Xplained Mini you need to go to Tools/Device Programming in Atmel Studio and select the settings button at the right. From here go to Tools/Tool settings and set Hide unsupported devices to False.